Steam’s screenshot feature is one of the most useful tools on the platform.
With just the press of a button, you can capture a beautiful or exciting moment and store it on your computer for however long you want.
In-game screenshots captured by Steam’s tool can be easily shared on your Steam profile for your friends to view, rate and comment on. If you’re feeling particularly proud, you can also share them on social media.
New Steam users might not know how to do this, which is why this concise guide includes straightforward, step-by-step instructions for capturing screenshots on Steam.
You might already be using a third-party screenshot tool, but Steam’s tool has a lot of added functionality.
Note: The default Steam screenshot button is F12.
Table of ContentsShow
Taking A Screenshot On Steam While In-Game
This guide will help you become more familiar with the Steam overlay and its settings, as well as teach you how to configure your own screenshot shortcut key.
- Launch Steam on your PC and log into your account.
- Once you have successfully logged in, navigate to the top left corner and click on “Steam” and then “Settings” in the dropdown menu.
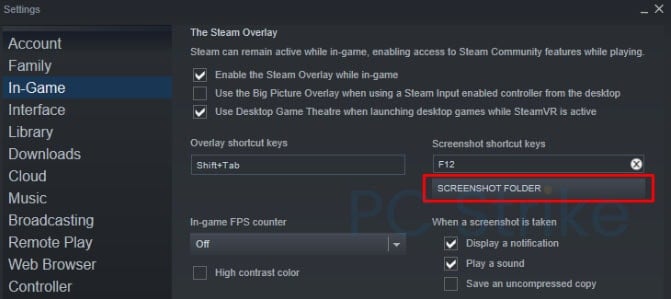
- On the left side of this menu, you will see various options. You need to click on the “In-Game” section of the Settings menu.
- Make sure you tick the “Enable the Steam Overlay while in-game” option, as screenshots cannot be taken or saved without this setting applied.
- In the same section, you will see the screenshot shortcut button. By default, this is set to F12. If you would prefer to use a different button, feel free to reassign it.
- Beneath this setting, you can also set a different screenshot folder. If you want easy access to your screenshots, create a new folder on your desktop called “Steam Screenshots” or anything you prefer, and assign that one instead.
- For further customization, Steam allows users to modify what happens when a screenshot is taken. Select whichever settings you prefer, such as hearing a sound to confirm a screenshot has been taken.
- The final step is to launch any game in your Steam library, then press F12 or whichever shortcut you’ve chosen. You should have successfully taken a screenshot!
Accessing Your In-game Screenshots Through Steam
You can access your screenshots immediately after taking them, but you have to do this manually. There are more convenient ways of viewing your new images.
You can achieve this with one click after exiting the game you’ve been playing. Steam avoids interrupting your gameplay by displaying you the screenshot after capturing it.

If you don’t see a post-screenshot screen right away, don’t worry. It will show up on your screen once you finish playing the game. If it doesn’t happen by itself, give this a try:


When clicking “Show on disk,” you will access the screenshot folder located on your hard drive or SSD. From here, you can manage your screenshots, delete them or add new ones.
The following section explains how to create a new screenshot directory.
Changing The Steam Screenshots Folder And Creating A New One (Directory)
If you don’t appreciate Steam’s default location for your screenshots, you can easily select a more convenient folder instead.
Follow these instructions:


Conclusion
Now that you know how to take a screenshot on Steam, it’s time to start capturing some of the most beautiful and exciting moments you encounter while gaming. Rare achievements, victories, embarrassing defeats, or anything else you feel like sharing are welcome on Steam’s news feed.
Your Steam friends can see the content you post by accessing the community section. Steam currently provides every user with 1GB of personal Steam Cloud Storage space. That’s enough for plenty of screenshots!


