
Dealing with bugs on Steam can be aggravating, particularly if you treasure your scarce spare time set aside for gaming and it gets interrupted by a mistake.
Fortunately, for every problem, there’s a solution.
This guide concentrates on the infamous “Content File Locked” error that individuals experience when updating games.

If you’re dealing with this error and don’t know how to fix it, there are multiple tested methods you can try. You can find them below.
Table of ContentsShow
Fix 1: Disable Antivirus Software Temporarily
Antivirus programs can be very useful, but sometimes they mistake a legitimate program, such as Steam, for a threat.
This Reddit post is from a user experiencing that exact issue. Their solution was to disable AVG, popular antivirus software that kept “flagging” one of the game files as a potential threat.
If you are currently using antivirus software, temporarily disabling it until the game has updated should fix the problem.
Please note that this can also happen with Windows Defender, not only with third-party antivirus programs.
If you are using Windows Defender, here’s how you can temporarily disable it.
- Open the Search function in the bottom-left corner of your screen in Windows.
- Type “Virus & Threat Protection” and hit Enter.

- The main panel will open. Click Manage settings.
- At the top of your screen, you’ll see “Real-time protection.” Disable it.


Now re-open Steam and see if the problem persists. If you manage to install the files successfully, you can re-enable your real-time protection to keep your system safe.
However, if enabling it starts causing problems again, you can set up an exclusion in the Windows Security panel for the particular file repeatedly being flagged. To do so, follow the steps below.
- If you already have the Windows Security panel open, scroll down to the bottom.
- Under the Exclusions menu, click “Add or remove exclusions.”

- Select the files you want to exclude from Windows Defender’s interference.
- You can also add Steam to this list.

The problem should now be fixed.
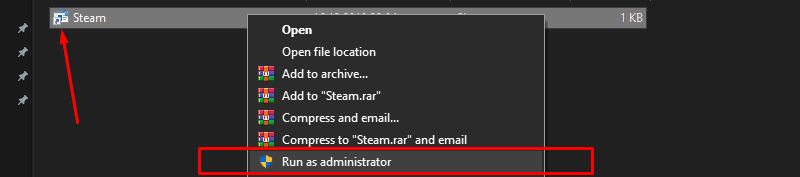
Fix 2: Run Steam With Administrator Privileges
Multiple users reported that running Steam with Managerial privileges solved the issue for them. It’s a rapid method, so it’s certainly worth trying.
The top comment of this Reddit thread suggests this as a possible solution.
If you’re not sure how to accomplish this, follow the steps below.
- Right-click on your Steam shortcut if it’s already on your Desktop. Select Run as administrator.
- Log into Steam as you normally would and try installing or updating your game again.

If Steam is “pinned” on your Start Menu instead, you can do this:
- Open your start menu and find Steam.
- Right-click it, hover over “more” with your cursor, and select Run as administrator.

Combining this with the previous method should help you get rid of the problem. If it doesn’t, there are other methods you can try.
Fix 3: Change Your Game Files Location
This is one of the more complicated solutions, but it also has a high probability of working. Here’s what you need to do.
- Open the Steam client and log into your account.
- In the top-left corner, click Steam and then Settings.
- On the left side, click Downloads and then Steam Library Folders.
- Select Add Library Folder and create a new one in your preferred location.
Now you will need to delete a few files, but don’t worry! Your save files and game content will remain untouched.
- Close Steam completely (not just by clicking the “X” in the top-right corner).
- Navigate to your Steam directory. The default location is C:Program FilesSteam.
- Delete everything in that folder except UserData and SteamApps.
- Move the UserData and SteamApps folders to the new folder you created during Step #4 in the first section.
- Open Steam and log into your account. Try updating your games.
The problem should now be fixed. If it still isn’t, these few extra steps should help.
- Close Steam again. Open your newly created folder (the one you made during step 4).
- Move the SteamApps folder somewhere else. Your Desktop is fine.
- Uninstall Steam from your PC. Do not delete your SteamApps folder.
- Download the “.exe” and install Steam in the new folder you created during step #4 in the first section.
- Move your SteamApps folder to the location where you just installed Steam.
- Launch Steam and log into your account.
- Verify the integrity of the game cache for the title you want to install or update.
You can learn more about verifying the integrity of the game cache in this official Steam article on the topic.
If this method doesn’t help, resetting Winsock may be the best solution. Read the following section to learn more.
Fix 4: Reset Winsock
Resetting Winsock has helped many users overcome the “Content File Locked” error on Steam. It’s easy to do and definitely worth a try.
Here’s what you need to do.
- Press Windows + R on your keyboard. In the box that appears, type “cmd” and hit Enter, or press the OK button at the bottom of the window.

- You are now in Command Prompt. Type “netsh winsock reset” and hit Enter.
- Restart your PC, as the returning message in Command Prompt suggests.


After your PC reboots, launch the Steam client and throw another attempt at updating your games. The problem should no longer occur.
Note: Windows might ask you to run an elevated version (as an administrator) of Command Prompt for this specific change.
For more information on what this does, take a look at the following section.
What Is Winsock, And How Does Resetting It Help?
Essentially, resetting Winsock will set important network settings to their defaults. That might sound serious but doing so is completely safe.
This article states that resetting Winsock can solve an issue where you can’t view certain web pages or download files despite having a stable Wi-Fi connection.
Conclusion
One of the major benefits of Steam is how it lets users update their favorite games with just the click of a button, and often even automatically. However, the “Content File Locked” error makes things more difficult than they would otherwise be.
Now that you grasp how to halt this from occurring, you should be able to maintain your library updated without any additional complications.


